 "Tachyon Racing" (tachyonracing)
11/29/2015 at 13:37 • Filed to: None
 22
22
 10
10|
"Tachyon Racing" (tachyonracing)
11/29/2015 at 13:37 • Filed to: None | 22
| 10 |

This is the second post in our Rally 101 Series.
Have you ever wondered exactly what it takes to build a rally car? As a result of a little “ !!!error: Indecipherable SUB-paragraph formatting!!! ” I had at Magnum Opus in 2014, I’ll be building my third rally car. The wreck ultimately did very little damage to anything other than the chassis of my 2.5 RS rally car. Disassembly essentially left us with a “rally car in a box.” To get back on the road, all we needed was a new shell and plan:
Step 1: Find a new chassis
Ranging from practical to emotional, there are a lot of factors that go into deciding what kind of rally car you want to have. If your goal is to build a car from scratch, I would recommend starting with whatever you already have parts for, or are most familiar with. The chassis should not be too rusty, or crashed to the point that you can’t align it. A slightly older car that has been totaled due to a fender bender is a perfect candidate. If you’re looking to be competitive, you will break things, so something like a 90’s Dodge Neon has a significant advantage over a 70’s Porsche in terms of getting a new control arm off of Amazon, or a fender from a junk yard. Availability of good off-the-shelf rally suspension is also a significant advantage if you’re looking for those podium spots since rally dampers take quite a bit of development to get right.
In our case, another “GC” Subaru Impreza chassis would have been easiest, since all of the parts we have already would just bolt in. We’ve decided, however, to go with a slightly newer “GD.” Most parts are still compatible between the two, and you get a decade’s-worth of chassis technology advancement. In honesty, the driving factor was that I’ve always had a sweet spot for the “Bugeye” Impreza.
Step 2:
Strip the chassis
At the very least, a stock car will need to have it’s interior removed for cage installation. Beyond that, you can decide exactly how “stripped” you’d like your car to be. Full media blasting, which removes everything that’s not metal from the chassis, is probably overkill for an amateur level car. I would, however, recommend completely removing all of the interior, dash, wiring, glass, and fuel lines to make the cage fabricator’s job easier, and prevent damage to things you’ll need later. This is the point where you should seriously consider your goals for the car. If this is your first car, don’t worry about painting too much, or things like seam welding. If you’re looking to seam weld, reinforce, paint the whole thing, and change every bushing you might as well disassemble everything from the get go since it will save you time later on.
We were planning on doing a substantial amount chassis prep on our car, so we’re:
Removing all of the interior, including the controls, center console, dash, dash bar, and heater core
Removing the doors, trunk, hood, and fenders
Removing all wiring
Removing the front and rear glass
Removing the roof panel
Removing all mechanical components except the suspension and e-brake. We’ll remove the latter once the car is caged and doesn’t need to be moved around
Step 3: Cage
This is the point where your car officially makes its transition into being a race car. A rally cage is not an area to skimp on. It’s there to save your life, and should be put together by a very experienced welder/fabricator. If you have that experience, great! If not, ask around for a recommendation from the rally community, or organizers. The last thing you want to do is simply drop your car off at the local tuner shop, since you’ll probably end up paying more for an inferior product. There are very specific requirements for cages, and you will not be allowed to race if the car does not meet them exactly. Fortunately, both !!!error: Indecipherable SUB-paragraph formatting!!! and !!!error: Indecipherable SUB-paragraph formatting!!! rule books provide incredibly detailed descriptions, including many pictures, so make sure you read those before any sort of cage work is started. Generally speaking, the cage rules are similar enough that a Rally America legal cage will be legal for NASA, and vice versa.
For our cage, we’re taking the car to Thompson Racing Fabrication, an excellent Michigan shop with a lot of rally fabrication experience. Ryan, the owner, has done excellent work for me for many years, and having battle tested the TRF cage in my previous car, this was a natural choice.
Step 4: Chassis prep
This is where things get interesting! Once the cage is in, it’s time to do any remaining chassis prep. This is anything that requires welding or painting. Grab a notepad, sit down in the car, think about everything that will go in/on it, and how it will be attached - HDPE, skid plates, mud flaps, tool kit, extinguishers, spares, jack, etc.
As noted earlier, you’ll want to carefully consider your goals for the car at this point. If this is the first car you’re building, I would simply throw a coat of primer/paint on the interior, touch up the underbody, figure out how you’re going to mount an engine skid-plate. If you can confidently say that you will want to get a dozen or more stage rally events out of the chassis, it might be wise to do a bit of seam welding, reinforce the suspension mounting points, and put some HDPE (or similar) under the floor pans. I’m a big fan of weld nuts when it comes to attaching anything to the bottom of the car, as it makes both installation and removal easy. When it comes to underbody protection, in my experience, using fewer big fasteners is better than many small ones, allowing for quicker service and less chance of getting destroyed to the point of having to bust out a drill.
It’s hard to do when building your shiny new rally car, but keep in mind that it’s not going to be shiny for long. It’s probably not worth trying to get your cage paint to look absolutely perfect.
For our car, we’re doing a pretty thorough job with the underbody - weld nuts for everything, reinforcement of the strut towers, mild seam welding, as well as painting the under body, engine bay, and interior. To make some of this easier, we’ll be putting the car onto a “rolltisserie”, a contraption I put together for my previous build (juicy details in a future post)
Step 5: Reassembly
This step involves reinstalling everything to make a car a car again. It’s a good opportunity to change wear items like bushings, bearings, ball joints, belts, seals, and anything else that stands to be replaced. Applying anti-seize on anything that doesn’t need loctite is good practice as well, especially if you live in the rust belt like we do.
All of the rally-specific items will also be getting installed at this point. Both NASA and Rally America have very specific requirements for cage padding, fire extinguishers, first aid kit, spill kit, and triangles. Not having the right kind, quantity, or location can end your rally before it begins, be sure to check the rule book before you buy/mount anything.
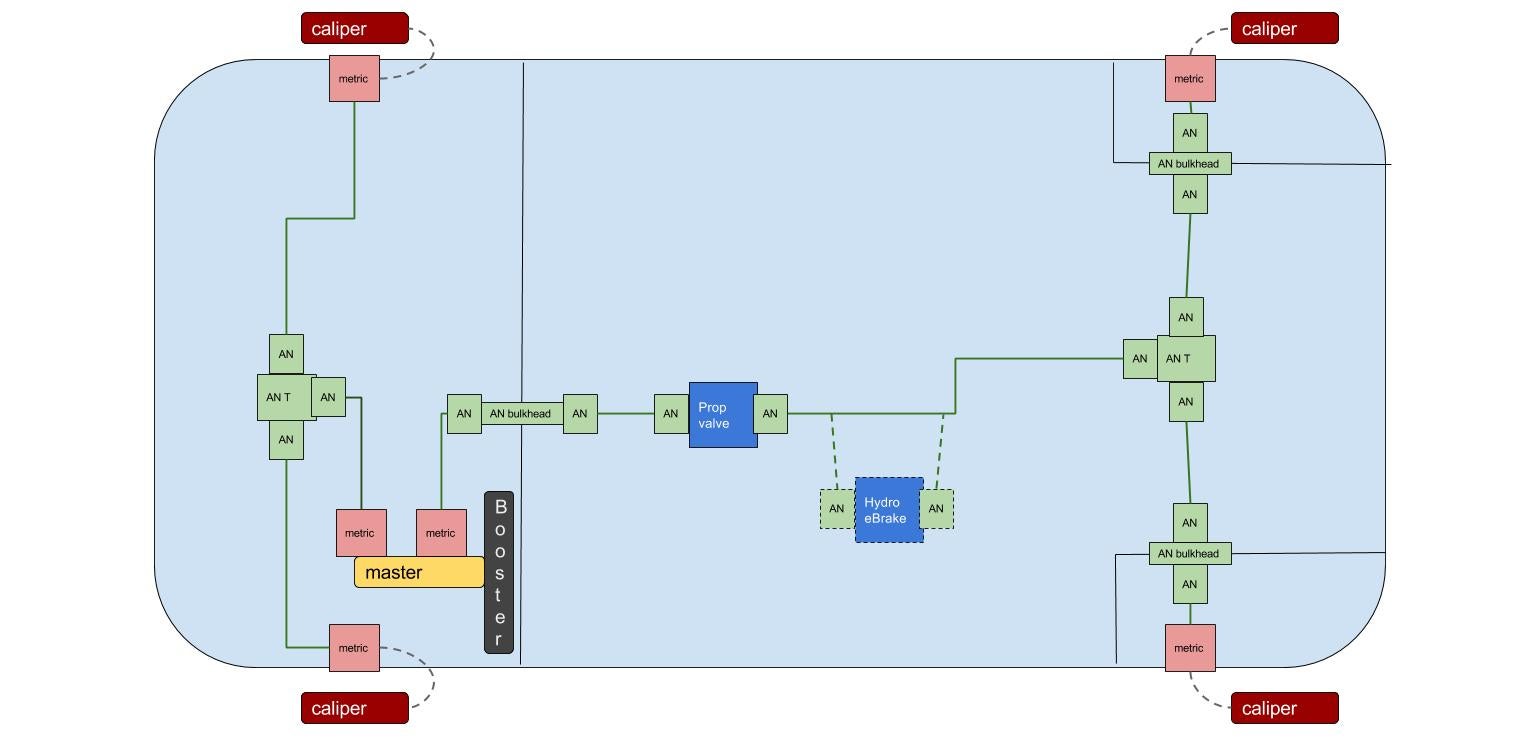
Our plan is to refresh all of the bushings, bearings, and balljoints in the suspension, as well as the cam/crank seals and belts on the engine. Custom brake lines will be run, and prop-valve installed in the car. The RSSP suspension will be refreshed, and the rear top mounts changed to fit a GD. Since we have all of the rally-specific items that go inside the car from the previous chassis, we’ll reuse most of that, using the mounting we put in place during chassis prep. Some custom wiring for the driving/navigator lights will be needed, but we will mostly retain the factory harness for reliability/simplicity. There is a lot of interesting work that will be happening here, so look for future posts covering it all in more detail.
Step 6: 3, 2, 1, Go!
It’s an unwritten rule that no matter how well you plan, race car prep always comes down to the last minute. That being said, we’re hoping to at least do a shake-down rallycross before we load the car up and head south to SandBlast.
Tachyon Racing is comprised of a Michigan- based driver Dmitriy Martynov and co-driver Molly Disend blasting their way through the motorsports scene. Dmitriy is a veteran driver who enjoys rallyX, autoX, and ice racing in addition to dirt biking and motorcycling. His passion and competitive drive lured Molly to join him in both TSD and stage rallies. Stay tuned for updates as we develop our team, build a rally car, and post occasional pictures of our lovable rally dog, Gogi.
!!!error: Indecipherable SUB-paragraph formatting!!!
 The-Ever-Socially-Apathetic TBAL
> Tachyon Racing
The-Ever-Socially-Apathetic TBAL
> Tachyon Racing
11/30/2015 at 11:25 |
|
Thank you for this.
Seriously.
 phillipm
> Tachyon Racing
phillipm
> Tachyon Racing
11/30/2015 at 11:28 |
|
Shorter list of what it takes:
1. Stubborness
2. Money
3. Time
4. Money
5. Hammers
6. Time.
7. A welder
8. Time.
9. Money
10. Stubbornness
 Tekamul
> Tachyon Racing
Tekamul
> Tachyon Racing
11/30/2015 at 11:31 |
|
This is nice. Good to see I’m not the only one making ‘highly technical’ sketches in PPT/Draw.
 Dar
> Tachyon Racing
Dar
> Tachyon Racing
11/30/2015 at 12:24 |
|
I cannot star this enough! Getting closer and closer to pulling the trigger on a GC Impreza based rally car and this will be a welcome guide (albeit with the GD). I’ll be eagerly awaiting the follow ups.
 doubleshotpower
> Tachyon Racing
doubleshotpower
> Tachyon Racing
11/30/2015 at 16:28 |
|
Very cool write-up! As someone that’s been building sports racing cars for the past 10 years (and racing engines for the past 30 years), I love to learn more from other racing series.
Strangely I've recently befriended someone new to dirt track racing, and I'm now building an engine that'll hopefully leave other class participants in awe. Having many years of Flowbench experience comes in handy.
 Fuck Jim Spanfeller
> phillipm
Fuck Jim Spanfeller
> phillipm
12/01/2015 at 04:25 |
|
You left out a few moneys.
|
Tachyon Racing
> Tekamul
12/01/2015 at 10:33 |
|
Some times the simplest programs are the best ones. Having used many a technical drawing programs during my time in IT/engineering, I still come back to this one.
|
Tachyon Racing
> Dar
12/01/2015 at 10:37 |
|
It’s a confusing thing to navigate for the first time. Having been there myself fairly recently, I find that the Internet makes it both easier and more difficult at the same time. There is so much information, but a substantial amount of it either sends you in a direction of (over)building a $100k WRC car.
Hence I’m hoping these posts will be helpful for an average person, building a car in their subdivision garage, on their own dime. Stay tuned and let us know if we can help!
|
Dar
> Tachyon Racing
12/01/2015 at 11:51 |
|
I’ve got a decent amount of friends in the local rally community that know how to put together a good car but having something documented from start to finish will be the icing on the cake. Thanks again. Look forward to more progress.
|
phillipm
> Fuck Jim Spanfeller
12/04/2015 at 19:58 |
|
I didn’t have any more monies left to put in. Spent them all on the rally car.